Print Friendly and PDF

Saturday, March 31, 2012

Baklava Rolls (Step by Step Pictures)-Guest Post For Kavi @ Edible Entertainment

When Kavi @ Foodomania  invited me to be her CWK Guest,I was very much thrilled.This was a very big surprise for me. Kavitha (Kavi) has a very fine art in cooking ,although she is a CA student but I always admired her aspiration,energy & interest in cooking at a very young age.She always cheers up through her encouraging comments.She has hosted many events and I love the post where she had mentioned the substitutes for eggs in baking,lovely post !!She has put lot of efforts in her beautiful space.I appreciate her willingness to bring out many bloggers as guest post for her 'Cooking with Kin Series' and very happy for this very moment.When you feel happy,every one loves to celebrate it with sweets,Isn't it?


And so here comes,my celebration with the Baklava Rolls !!Though Baklava is a sweet of Middle Eastern countries and it can be made in many shapes.I have used the phyllo sheets to prepare & Instead of honey,I have used sugar syrup to glaze.So,friends,enjoy these yummy rolls  @ Foodomania!!


So,friends hop into Kavi's space for detailed recipe and step by step pictures,hope u'll enjoy and support her space through your loving comments :-)

Have a Great Weekend  !!!

Thursday, March 29, 2012

Thakkali Curry | Tomato Curry using Yogurt and Coconut Paste

Many a time it so happens that you got to crack the head to finalise a menu for the day or sometimes when you start preparing some dish you find some of the important ingredients missing but one thing always that my pantry has is onion & tomatoes,and so this is a simple quick fix for a hectic day or perfect lunch box curry for kids as it's only mild spicy & this super easy delicious recipe is perfect with rice.This was one of my childhood favorite too, it has a blend of all the three lovely flavors..Check this out,friends for your loved ones :-)


Ingredients
tomatoes 2 chopped
yogurt / curd 1/2 cup (preferably sour,diluted to 1 cup)
turmeric powder 1/2 tsp

to grind
coconut 1/2 cup grated
garlic 3 small pods
shallots 2
chilly powder 1/2 tsp
cumin seeds 1/2 tsp

to temper
shallots 2-3 sliced
red dried chilly 3
mustard seeds 1/2 tsp
salt
curry leaves
oil 3 tsp


Method
-Wash and chop the tomatoes.Microwave on high for 10 minutes with a little water,turmeric powder and salt or if using stove top, then cook the tomatoes with a little water,salt and turmeric powder until done(takes 5 minutes on medium flame)
-Grind the coconut with cumin seeds ,chilly powder,shallots and garlic to a fine paste.Add in the ground paste. Don't boil the mix as the ground paste looks curdled. Simmer for 2-3 minutes
-Lower the flame and add the freshly whisked (diluted) yogurt. Mix well and switch off the flame.
-Heat oil in a wok, splutter mustard seeds.Add in the curry leaves,red dry chillies. Add the sliced shallots and fry until a light brown shade. Pour over the curry.
-Serve hot with steamed rice.


NOTES
* If you are not using a microwave add the chopped tomatoes to the kadai ,add 1/2 cup of water and cook for 5-7 minutes.

Sending this to The Kerala Kitcheni,Only South Indian,CC Plant Based (Vegan),Walk Through Memory Lane, Spotlight -Lunch Box Ideas,I'm the Star, 

Wednesday, March 28, 2012

Pinwheels Dates Cookies

Hi friends,
Just a gentle reminder to all ,My event is getting over at my space within 4 days.So buddies,rush in your entries soon.Coming back to today's recipe - Puff pastry sheets, a very versatile sheets n has super quick appetizing or snack ideas.Pinwheels are one such recipes that can have many different fillings.Each of us love recipes that are healthy though exceptions apart :-) .I filled it with dates and rolled it out and to my surprise,all vanished within no time.A super quick snack and I bet no kids would say 'No'.

Check out other related puff pastry sheet recipes- Nutella Palmiers,Sweet Moongdal Puffs, Egg Puffs, Sweet Plantain Puffs, Apple Cinnamon Toaster Strudel ,Savory Tarts


Ingredients
puff pastry sheet 1 thawed
dates 6 oz (170g)
brown sugar 1/4 cup
almond slices 1/4 cup
water 1/3 cup
lime juice 1 tsp
egg white 1


Method
- Thaw the pastry sheet as per packet instructions.Preheat oven to 400 degree F.
- Heat a pan with water and add chopped dates.Boil the mixture till softens and then almond slices.Add in the lemon juice.Leave for cooling.
- Roll out the pastry sheet on a lightly floured surface,and spread the filling with a spatula on all sides.
- Start rolling from one side and roll it tightly.
- And then start cutting the rolls 1/4 inches thickness ,makes about 20 pieces.
- Place it in a tray lined with parchment paper.And arrange it in a distance of 2 inches apart. Brush the top with egg white.
- Bake it in the oven for 15 minutes till light brown.
- Cool n a wire rack and serve with tea.


Servings ~20 cookies

NOTES
* You can add in jaggery in place of brown sugar.


Sending this to I'm The Star, Tea Time , Lets Cook Speedy Snacks


Monday, March 26, 2012

Baked Potato Wedges (spicy tangy flavor)

Yesterday we had a good rainfall with thunderstorms and we enjoyed watching the rain drops with small ice pellets hitting the glass panes of windows.Soon there was a layer of ice pellets on the ground and melted away soon after the rain stopped.Its indeed a natural pleasure to see the rains drizzling and we feel to have something hot and spicy to enjoy the warmth inside.That's how I ended up making these baked potato wedges with a cup of hot tea.Its a very simple yet tasty n oil free recipe to enjoy !!


Ingredients
Potatoes 6 medium
Garlic,chopped 6 cloves (make a paste)
Pepper powder 1/2 teaspoon
Olive oil 6 tablespoons
lemon juice 2tsp 
salt to taste


Method
Preheat oven to 350 degrees F or 180 degrees C and cut the potato wedges without peeling the skin.Blanch them in hot saline water.Mix in the spices ,salt and garlic,olive oil,lemon juice.Line atray with aluminium foil and layer the potatoes in it .Place it in the oven and bake for 15-20 minutes. Serve Crispy baked potato wedges with tomato ketchup!!

NOTES
* You can add a tsp of mixed herbs as well.


Sending this to I'm The star ,Lets Cook Speedy Snacks ,Bon Vivant Savory Items,Tea time ,Any One Can Cook Series 45

Lemon Pickle (Naranga Achar) ~ Kerala Style

Lemon pickle or Naranga achar is a tangy flavourful pickle which is mostly accompanied by biriyani and a common item in sadya and marriages in Kerala.This recipe is from my mummy, the way she prepares it, and we used to cherish the pickle just dropping into the palms and gulping it.The same carried throughout the hostel days as well.We used to get the pickles from home and just devoured it during our late night study sessions and chit-chat times.These recipes really brings back nostalgia.Though a familiar recipe with many, just sharing for my newer buddies in cooking.(The pictures were taken after 2 weeks of preparation)

HOW TO AVOID LEMON PICKLE FROM BECOMING BITTER-
The white pith and the seeds contribute to the bitterness in lemons. So, try these tips to avoid the mishandling.
* Steam cook or boil the lemons in water for 4–5 minutes. Don't wait for the lemons to break open.
* Cool the lemons completely before slicing or cutting. Use a sharp knife to have a smooth cut and avoid crushing the white pith portion.
* Wipe the lemons with a dry paper towel to remove the oils. 
* Cut along the lines of the lemon vertically, if possible.
* Discard as many seeds as possible. Don't add to the pickle.
* Add a tsp of sugar to balance the flavours.
* Start using the pickle only after 2 weeks, giving time to soften the peels. Place on the worktop near the stove or keep under the sun for 4–5 days. 


(old pic)


Preparation time ~ 15 minutes
Cooking time ~ 15 minutes
Serves ~ 500gm of pickle
Author ~ Julie
Ingredients 
lemon 500g (1/2 lb) 
green chillies 4 vertical slit
garlic julienned 2 tbsp
ginger julienned  2tbsp
fenugreek powder 1/2 tsp  
asaefoetida 1/2 tsp
hot chilly powder 1 tbsp
kashmiri chilly powder 3tbsp
turmeric powder 1/2tsp
mustard seeds 1tsp
fenugreek seeds 1/2 tsp
water boiled 1/2 cup 
salt 1tsp + 1/2 tsp
gingelly oil 3-4 tbsp
sugar 1tsp (optional)
vinegar 1/4 cup
curry leaves 2 sprigs


Watch on YouTube-


Method
  • Wash the lemons and steam the lemons in a steamer with adequate water for 15 minutes.(I used the idly cooker).Cool it completely and then cut into half and then small quarters.Add a tsp of salt and leave for 30 minutes.
  • Heat oil in a pan and splutter mustard seeds.Add the fenugreek seeds, then curry leaves, ginger, garlic and green chillies.Stir-fry till lightly crisp.
  • Add the spices on low flame and add boiled water into it and boil the mix. Boil till oil separates on top.
  • Slide in the lemon pieces, give a stir. Bring to a boil for 2–3 minutes, adjust salt, vinegar and sugar.
  • Switch off the flame. Leave it in the pan till completely cooled and then bottle it for further use.


NOTES
* The pickle is ready to serve only after 1 - 1 1/2 weeks.Leave it in sun for another 2 weeks daily and this help the lemon pieces to soften.
* There is another alternative to steaming.Wash and cut the lemons and place them in a jar containing salt for 4–5 days in the sun.
* The lemons should cool down completely before cutting, otherwise the pith will leave a bitter taste.
* The sugar addition enhances the taste of pickle, helps reduce the sourness of lemons.
* Always let the oil remain on the top of the bottle as a layer to prevent fungal growth and use a clean dry spoon for each use.Stays good for a year without refrigeration.


Friday, March 23, 2012

Instant Jalebi & Erivum Puliyum Turns One Today :-)

How fast time flies off ?A Year has passed since the day I started blogging..A long way of 12 months,but when I sit back and think it was like yesterday.Two of my friends I still remember Sadhana @ Sensible Vegetarian and Priya @ Now Serving were the initial ones who visited my space at the initial posts and my first blogger friends.They encouraged me with their lovely inspiring comments and that's how this space of mine went on further with many friends reached this milestone.No stats,no page views,no followers list to elaborate - Just a word of Thanks to all my dear buddies (not listing one particular friend)who kept encouraging my recipes all throughout the year.Yes,friends am humbly honoured to have very good friends like you and hope that you will continue to keep the same spirits and drop your encouraging comments at my little space :-)


Coming to today's recipe - Instant Jalebis.Jalebi is one sweet which I can never resist eating though I am not a big fan of sweets..But this very sweet was always a frightening part (u know the reason ,the shapes looks complicated:-))I know it might be with many others too..But believe me,frenz..when I actually saw the video at Show Me The Curry it was like everyone could give this a try.The best part I liked about their recipe was this was very easy fermentation (usually jalebi require overnight fermentation) and that was the main reason I kept postponing ,and my first attempt to jalebis,they tasted good like the store  brought ones,We all just loved it :-)


Ingredients
all purpose flour 1 cup
yeast 1tsp
cardamom powder 1/8 tsp
warm water 3/4 cup
corn starch 2 tsp
yellow color 1/2 tsp (optional)
oil 1 tsp
yogurt 1 tbsp

for sugar syrup
sugar 1 1/4 cups
water 1 cup
saffron 1 pinch(optional)
lemon juice 1 tsp
cardamom powder 1/4 tsp

oil for frying


Method
- Add the yeast in warm water and mix well till frothy and foamy.
- Mix thoroughly in a bowl,all purpose flour,cardamom powder,yeast,corn starch.
- Add the yogurt, yeast water,oil and mix well till there are no lumps.
- Take a larger bowl,add very warm water.Place the batter mixed bowl in it.(Cover the batter bowl other wise water from other bowl may slip into it and this helps in rapid rise,Place the bowls in an oven or any dark place)
-Rest the batter for 30 minutes,in the mean time after 15 minutes start preparing the sugar syrup.
-In a sauce pan,add sugar,water and bring to boil.Boil for 15 minutes.Reduce flame to simmer and add in the lemon juice and cardamom powder,mix.
-Heat oil in another pan to fry jalebis. Remove the jalebi fermented batter ,mix well and pur it in a ketchup bottle / ziploc bags.(I used a chocolate syrup bottle)
-Squeeze out the batter into the hot oil and make circular motions of your desired shapes and finish the ends in the middle so that the ends don't open up.
-Cook till the bottom side turns golden and puffs up ,flip the other side and cook .
-Remove from oil and shake the excess oil, place it directly into the prepared syrup.
-Allow the jalebis to remain in syrup for a minute both sides and remove unto the plate.
-Continue the same process for ther jalebis.
-Serve hot or serve cold .Keep it in a air tight container unrefrigerated ,remains good for 4 days.

Servings ~ 20 jalebis


NOTES
* You can put off the flame of sugar syrup if it starts becoming thick.
* You can either use yellow food color to batter or use saffron to the syrup.Both together is not required.I used yellow color.
* There is no much wastage of sugar syrup its just required amount.


Thursday, March 22, 2012

Mixed Beans Stew

 Mixed bean stew is a healthy combination with idiyappams or appams that you can prepare quickly and this is one of the healthy combinations too. I had a pack of mixed beans and so tried making this stew which everyone like at home. So thought of sharing his here.               

Please check out a few related posts- 
                                       

Ingredients
mixed beans 1 cup
turmeric powder 1/4 tsp
salt to taste
potato 2 boiled & mashed
green chillies 2 vertical slit
curry leaves a sprig
onion 1 medium sized sliced thin
coconut milk (thin) 2 cups
coconut milk (thick) 1/2 cup
garam masala 1/2 tsp
pepper powder 1/2 tsp
turmeric powder 1/4 tsp
salt to taste
coconut oil 2tbsp


Method

  • Soak the beans in hot water for 1 hour. Boil and mash the potato, keep aside. Cook in the pressure cooker for 1-2 whistles with adequate water, salt and turmeric powder.
  • Heat oil in a pan and sauté onion till translucent, add in the green chillies, curry leaves. Add the spices on low flame, stir. Adjust salt.
  • Add in the cooked beans, mashed potato and thin coconut milk. Cook covered for 5 minutes till it comes to a boil. Uncover lid and cook for another 2 minutes.
  • Lower the flame, add the thick coconut milk. Put off the flame. Serve it with appams/Idiappam.


Idiyappam | Nool Puttu (Rice Noodles / String Hoppers)

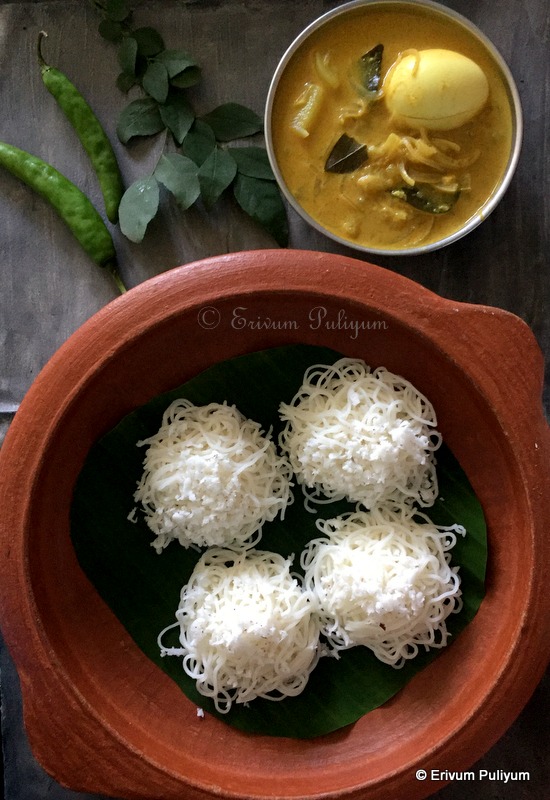
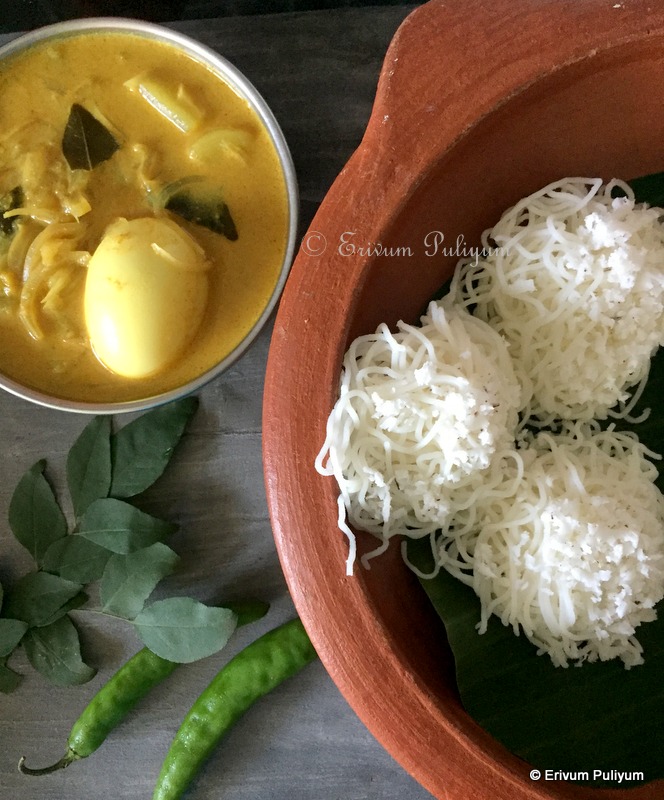
Idiappam is a favorite guilt free breakfast or snack recipe from 'God' Own Country'-Kerala.It's one of our family favorite and common in breakfast in many kerala homes. These are steamed rice noodles with a garnish of shredded coconut on top that can be served with sweetened thick coconut milk  or any other stew. This looks similar to the chinese noodles but are soft and steamed.


I usually prepare egg curry / kerala style egg potato currychicken stew /corn stew/egg pepper roast/ mutta aviyal with these but this I had a packet of 16 bean soup in my pantry and so thought to give this a try,It is indeed a very healthy alternative esp for my vegan buddies. The color of the stew may not look light as the cooked beans gives a dark brown color and so the stew color is darker. Enjoy this yummy combo:-)

Please click this video link for the detailed recipe.


Ingredients 
for idiyappam
rice flour 1 cup (roasted)
water approx 1- 1 1/2cups
shredded coconut 3 tbsp
salt
oil 1 tsp (optional; to prevent stickiness)


Method

  • Boil the water in a saucepan. Heat a pan and add the rice flour. Roast the flour for 4-5 min on medium flame until nicely roasted. To this, add salt and mix well. Keep aside.
  • Add the boiled water into the flour and mix using a wooden spoon. Pour the water slowly and keep mixing.
  • Leave for 5 minutes and then knead into a smooth dough by wetting your hands in cold water. Apply a tsp of oil at the hand to prevent sticking. Take the mould, wash and scoop the dough in it and press it in an idli moulds /plates greased with oil in circular motion. You can see the long strings appearing, cut with your hands to finish in each plate.
  • Then add the shredded coconut on top and steam the rice noodles as we do for idlis. Steam for 10- 15 minutes. Remove from flame and serve hot with sweetened coconut milk /stew /egg curry!!


Servings ~10 idiappams

NOTES
* You require roasted rice flour to prepare these. If you don't have roasted rice flour. Then dry roast the flour on low medium flame for 5 minute till you get a nice aroma. Cool and store as idyappam flour.
* You can serve it as snack too by preparing the sweetened coconut milk by mixing thick coconut milk and sugar to it. Kids will love this combo.
* If you have some left over idiyappams, then try out the idiyappam upma.

RELATED POSTS


Tuesday, March 20, 2012

My first Pizza -Apple Pizza (whole wheat flour base)

Baking a pizza at home,never thought.. but when I saw many of my blogger friends making this at home,It was a real energy booster and inspiration to try.I too thought to give this a shot and when I actually started off making pizza,I was not very sure of the outcome as I was giving a try to make it from scratch including the pizza base too and I wanted it to be with wheat flour alone.And so,am happy that I could try this at home and another true experiment,the outcome is right in front of you  :-).The topping I chose is apple,you can make your desired topping veg or non veg and sauces,cheese of your choices.But let me tell you a thing if you have kids who have stopped looking at apples then this is a wonderful idea to sneak in their apples and a perfect healthy one.I made the topping just like for the Apple Cinnamon Toaster Strudel,and that really tastes great.I was pretty much sure kids wouldn't say 'NO' to the prepared topping as they liked the toaster strudel and that's how I got into preparing this recipe and sharing it with all my dear buddies :-)


Ingredients
whole wheat flour 1 3/4 cups
olive oil 1/2 tbsp
warm water 3/4- 1cup
yeast  2tsp
sugar 2tbsp (or increase if you want the crust more sweet)
salt

for topping
apple 3 grated + 1 thinly sliced for top layer
butter 3 tbsp
brown sugar 1/2 cup
all purpose flour/ maida 2tbsp
cinnamon powder 1/2tsp (optional)
salt


Method
-Add the yeast in warm water along with sugar and stir.Keep aside for 10 minutes until it starts frothing.
-Sift the flour in a bowl ,add salt .Sift again.Add the olive oil and yeast mixture  and knead with hands to form a dough.
-Knead the dough smothly,place it in a covered bowl and leave to rise for 1 hour.
-Punch out the air  and knead again,leave aside for 45 minutes.
-In the mean time,prepare the topping.Wash ,peel and core the apples.Grate the apples on the large holes of grater. Add in the lemon juice and keep aside.
 -Melt 2 tablespoons of butter over medium heat in a sauce pan. Add the grated apples and toss until coated.
-Add the brown sugar, flour, lemon juice, cinnamon, and salt. Continue to cook stirring frequently, until the mixture is thick and syrup(took about 10 minutes). Remove from heat and stir remaining 1tablespoon of butter. Cool the filling .
-Preheat oven to 425 degrees F.
-Roll out the dough on a clean flat surface after dusting little flour to a diameter of 10" and 1/4" thickness.
-Prick with a fork in between the rolled base.Top it up with the prepared topping and spread evenly with the back of a spoon or offset spatula.
-Brush the left over sides of pizza base with olive oil ,gives a nice color.
-Place it in the oven and bake for 12 minutes first and remove from oven.
-Wash the remaining apple and slice it to spread.Spread the thin apple slices and then bake for another 6- 8 minutes until the top slices are baked and the crust gives a nice color.
-Remove from oven and cool a bit ,cut into pieces and serve with tea!!


Servings~ 1pizza of medium crust & 10" diameter(dinner plate size)

NOTES
* You can add jaggery instead of dark brown sugar.
* You can place the sliced apples on top in the first bake itself,if you wish it to be crunchy.I was not sure whether my kids would like the slices so just baked them.
* You can even add few nuts or raisins when you prepare the topping.
* Add in a scoop of ice cream or whipped cream after cooling the pizza slice and can be served as a dessert too!!


Sending this to ABC Series-Fruit Fiesta, Show me Your HITS -Fiber rich Foods, CC -Vegan diet(Plant Based) , I'm The Star ,Fast Food Not Fat food guest hosted by Uma@ My Kitchen Experiments

Monday, March 19, 2012

Ethakka Appam (Pazham Pori) | Ripe Plantain Fritters

Ripe plantain fritters or commonly known as Pazham Pori / Ethakka appam in Kerala is a famous tea stall snack that is devoured equally by young & old age groups.We all are quite addicted to this snack and I know there are many others too.This is one of the important marking snack at railway stations in all seasons though its more oily but you can't resist the looks & I always had it during our train journeys.Plantains are a speciality of Kerala and are very commonly found,and that also may be a reason for this snack to run popular through ages.Anyways stories apart,a simple & delicious snack to serve with a cup of tea!!


Ingredients
ripe plantains 2 or 3
all purpose flour 3/4 cup
turmeric powder 1/3tsp
cumin seeds 1 tsp
sugar 2tsp
salt

oil to  deep fry


Method
-Prepare a batter using the flour,sugar,salt & turmeric powder without any lumps.The batter should be of a slightly thick consistency(like dosa/pancake batter).
-Add the cumin seeds and keep aside for 15-20 minutes.
-Peel the plantains and cut lengthwise slices and then cut horizontally in between(thin slices cooks faster).
-Heat oil in a kadai /wok and bring the oil to boil.
-Dip the slices in the batter and spoon each slices into the oil once the oil is reached the boil.
-Flip and turn the slices and fry both sides till it changes color.Repeat the same step for other slices too. (If batter remains just spoon it into the oil,cook both sides and serve too,tastes good.)
-Remove it on a paper towel and serve hot with tea!!

Servings ~around 20 fritters with 3 plantains

NOTES
*You can omit the sugar if you wish,it enhances the taste of the flour coated.
* You can add yellow color too,turmeric is used to add color.
* The snack is not oil free but you can't resist these with just one:-)


Sending this to The Kerala Kitchen event hosted By Prathibha @ Cook Ezee for this month , Only South Indian, I'm The Star, Walk through Memory laneLets Cook Speedy SnacksCC Vegan Diet(Plant Based)


Friday, March 16, 2012

Peanut Mint Chutney

Peanuts are a very versatile kind of legume which has many recipes to its credit.One such recipe is this simple peanut chutney.I was trying this for the first time though had it in restaurants(as I was short of coconut),but it was a new flavor and the chutney is very thick.Its very tasty almost similar to coconut chutney in looks with idlis or dosas,and many of my friends do know about this too.I added the mint leaves too to enhance the aroma and helpful in easy digestion.If there is someone yet to try this,please do try this out n enjoy !!


Ingredients
Peanuts 1/2 cup
mint leaves 3tsp chopped
green chillies 3 chopped
garlic 1 clove (optional)
pearl onion 4-5 sliced
salt
sugar 1/2tsp
lemon juice 2tsp
water as required

for tempering
mustard 1/2 tsp
red dry chillies 3
curry leaves


Method

  • Soak the peanuts in hot water for 10- 15 minutes and blanch them by rubbing it with your hands.OR You can just dry roast them without any oil and remove the skin by putting it in a towel and rubbing your hands upon it,remove the skin and keep aside.
  • Put the peanuts ,mint leaves,green chillies,pearl onion,garlic clove,and salt in a blender and blend it till smooth.
  • Adjust the salt and add sugar to it ,just blend again for a minute.
  • Remove from blender and add in the lemon juice.
  • Temper the chutney by heating oil in a pan and splutter mustard seeds,red dry chillies and curry leaves.Add it to the chutney and serve with idlis or dosas!!
Servings~ half bowl of chutney


Sending this to  I'm The star, CC- Vegan Diet (Plant based), Only South Indian ,Bon Vivant- Savory Moments , Show me your HITS


Thursday, March 15, 2012

Lemon Chocolate Chip Muffins (Eggless)

Again eggless?? Yes,dear friends..Some of my friends have started asking me the same question,Have I given up eggs? No..But for sometime as we are observing lent till Easter and so as part of that I have given up all my non veg stuffs for a while..And now when I started eggless bakes,am really enjoying these,never thought  about a cake without eggs earlier and now blogging has given me the courage to try out eggless bakes.Thanx to all my blogger buddies who post their eggless recipes and Thanx to all my dearies who support these eggless bakes at my space through their sweet shower of comments:-)


 Baked goods with lemon zest or lemon juice gives a unique flavor.I love the aroma and taste of lemon in cakes & muffins ,so this is another interesting eggless version of muffins.The chocolate chips in these give a nice crunchy marbling effect.And the glaze on top gives a super glossy look (you can appreciate that in pics)which can be served without any additional toppings !!


Ingredients
all purpose flour 1 1/2 cup
baking powder 1 tsp
baking soda 3/4 tsp
yogurt 1 cup
sugar 3/4 cup
butter 6 tbsp
chocolate chips 1/2 cup (optional)
lemon zest 1 tbsp
lemon juice 2 tbsp
salt a pinch

for topping
lemon juice 1/3 cup
sugar 1/4 cup
lemon zest 1tsp

For decorating
lemon small slices
whipped cream 2 tbsp


Method-
-Sift the flour and add the salt.
-Line a muffin tray with baking cups sprayed with oil.
-Mix half the sugar and yogurt,add in the baking powder,baking soda and leave aside till its frothy and bubbles up.
-Beat the butter with remaining sugar till soft.
-Preheat oven to 400degrees F.
-Mix the lemon zest,lemon juice and add it to the dry ingredients.Add the yogurt mix and using a hand mixer ,mix well.
-Fold in the chocolate chips into it  and spoon the batter into the baking cups until its 2/3rd of the cup.
-Place it in the oven & bake for 20 -25 mins.
-Cool on wire rack & in the meantime prepare the glaze.
-Add the lemon juice ,lemon zest and sugar,mix well.Boil over medium heat and turn off flame ,coo and pour over the prepared muffins.
-I just scooped a bit of whipped cream on top on some of the muffins too as kids love this!!


NOTES
* While removing the zest from lemon or other citrus fruits,be sure to take only the thin colored portion or outer zest.The white pith will give your dish the bitter taste.
* Adding glaze gives a nice shine to muffins & flavor too.This glaze is a very mild one.
* The adding of whipped cream is optional just for kids !!


Sending this to ABC Series :Fruit Fiesta, CC Vegan diet (Plant Based)

Tuesday, March 13, 2012

Beet Leaves Stir fry / Thoran

Green leafy vegetables are a rich source of iron and have many other minerals in them.They make  a healthy nutrition in our diet and many a time widely used in dals,salads,stir fry,koftas n so on.We to love these green leafy vegetables a lot.Today's recipe is a simple preparation with beet leaves.A quick stir fry,hope you all will enjoy :-)


Ingredients
beet leaves  with the stem a bunch(exclude the last 2'' of the stem if its hard)
beet 1 peeled & chopped small
coconut grated 1/4 cup
onion 1 small chopped
green chillies 3-4 / red chilly powder 1/2 tsp
turmeric powder 1/3tsp
mustard seeds 1/2tsp
salt
oil 2-3 tsp
curry leaves 3-4


Method
-Wash and chop the beet leaves small with the stems as round slices excluding the last 2"of the stem.Peel the skin of  a beet and chop it small.Keep aside.
-Heat oil in  a pan and splutter mustard seeds,fry the curry leaves.Saute onion till lightly translucent.
-Add the green chillies and turmeric powder.Add the chopped beets,cover and cook on medium flame.
-In between stir it and cover it again,uncover lid after 10 minutes.Add the beet leaves and mix well.Cover again and cook for another 10 minutes.The leaves cooked ,add salt in,mix well and cook again for 5 minutes.
-Add the grated coconut now and toss again, dry the stir fry to remove any excess water.
-Serve hot with rice !!


Servings~ 1 plate serves 3 adults

NOTES
* You can use beet leaves alone .
* You can use the same procedure for other green leafy vegetables too.