Pages

Monday, June 30, 2014

Spicy Chicken Fry with Roasted Coconut

Chicken fry recipes are always inviting with all age groups of non vegetarian population and my family does love chicken fry a lot.How about adding the flavors of roasted coconut in chicken pieces?? mmmm..believe me,its lip smacking. It was just another trial and error,this just clicked away.This chicken masala may taste similar to chammanthi podi.But it gives a very unique flavor and loved it to the core.Do give this simple recipe a try and you'll have guests/family members asking for more.Though the recipe is subdivided in a few steps but it will hardly take away much time & efforts:)


Ingredients
to marinate

chicken with bones or boneless 300gm
red chilly powder 1tsp
garam masala 1 tsp
pepper powder 1/2 tsp
lemon juice 1 tbsp
salt to taste

to coarsely grind
dry red chillies 5
shallots 4-5
grated coconut 3/4 cup

to temper
dry red chillies 2
curry leaves 2 sprigs
lemon juice 1 tbsp
oil 1/3 cup(coconut oil preferably)
salt


Method
-Wash and pat dry the chicken pieces.Marinate the chicken pieces using red chilly powder,pepper powder,garam masala,lemon juice & salt for half an hour.
-Dry roast the grated coconut in a pan along with shallots and dry red chillies until golden brown like for theeyal.Grind/Powder the coconut mixture coarsely without water if possible else add few tsp of water.(I didn't add any water)
-Heat a pan and add oil.Wait till the oil heats up,add dry red chillies and curry leaves.Add in the marinated chicken pieces along with marinade.Cover and cook on low medium flame until cooked.In between toss and turn evenly all sides so that it doesn't stick to bottom.Chicken leaves out water slightly to get cooked and takes about 7-10 mins on low flame.Turn the heat to high,keep stirring the chicken pieces to slightly get browned and the water evaporates if any left out.
-Add the coarsely ground mixture,toss it well.Add salt for the mix and chicken if required.Cover and let the spices blend well,give a minute or two.Add the lemon juice,mix well.
-Turn off heat and serve warm with fried rice/pulao or just steamed rice !!!


Serves ~ 2-3 adults as side dish

NOTES
* You can use any oil but coconut oil brings out actual flavors.

Related Recipes : Tandoori Chicken,  
Thattukada Chicken
Chicken 65,
Broiled Chicken,
Pasted Chicken,
Quick chicken dry roast

Saturday, June 28, 2014

Mango Jam (Homemade)

Homemade jams are my favorite and love making these just to enjoy the real fruit flavors.I don't like the flavors of a store brought jam as its loaded with sugar and is with less fruit flavors.But jam making takes efforts and may not be very economical.However,if you plan to make jams in peak seasons of any fruit then it helps preserve the exact flavors to relish for a longer time and would be cost effective too.I had earlier tried the apple jam & grapes jam.This time I used citric acid instead of lemon juice and that preserves better.But if you plan to make a small batch and are sure about finishing it in two weeks then adding lemon juice works good too.Do give it a try in this mango season,you will definitely love it !!


Ingredients
mangoes(ataulfo) diced 4 cups
sugar 3/4 cup
citric acid 1/2 tsp /lemon juice 2 tbsp


Method
-Wash,peel and dice the mangoes small in cubes.Mix the sugar and leave aside for half an hour until sugar is dissolved.


-Heat a pan and add the mangoes with sugar syrup and keep the flame on low medium flame.Keep stirring frequently (else it may stick to the pan),mash the mango cubes as and when possible along with the stirring.(took half an hour)
-Add the citric acid or  lemon juice when the jam starts to leave the pan.Mix well and turn off heat.Remove from pan immediately else it may further thicken the jam. OR Check the desired consistency by pouring it in a plate.Tilt the plate at an angle of 45 degrees,the jam shouldn't flow down.Then its ready.
-Cool completely before storing in bottles.


Servings~ a small bottle

NOTES
* You can use any variety of mangoes but prefer to use mangoes with more flesh and less fibrous else it appears in the prepared jam.I had tiny fibrous strands in this jam.
* Add sugar as per tastes and sweetness of mangoes.I used only 1/2 cup sugar as the mangoes were sweet.


TIP OF THE DAY: Did you know rubbing a pinch of baking soda in coffee mugs/tea cups removes tough stains?? Do try !!!

Thursday, June 26, 2014

Crispy Rice Balls | Quick Snacks (Step by Step Pics)

Did you ever have over cooked rice at home??Often this doesn't happen deliberately and happens by chance but you end up scratching your head what to do next.This recipe is a perfect solution to all those who have faced such situations in the past and will face in the future too.Go ahead and try these crispy rice balls and you will end up over cooking rice consciously just to end up making this snack.So by now you might have guessed right,I over looked the rice cooking and ended up getting my first ingredient ready for this snack-over cooked rice.I then googled and got an easy quick answer,and was happy for two reasons-one got rid of the over cooked rice.Secondly got perfect crunchy balls to have with tea and surprise all.So,what's next?? Try & munch these cuties with ketchup !!


Adapted from here

Ingredients
cooked rice 2cups
rice flour 2tbsp
coriander leaves 2tbsp
onion 1 medium sized chopped
ginger 1" piece shredded
green chillies 3-4 chopped fine
cumin seeds crushed 1 tsp
asafoetida 1/4 tsp
salt to taste
oil to deep fry


Method
-Put the cooked rice in a bowl,add in the chopped onion,coriander leaves,asafoetida,cumin seeds,ginger,green chillies chopped fine,salt and rice flour.Mix the mixture well with your clean hands mashing the cooked rice,adjust salt.


-Heat a wok/ kadai with oil and wait till its hot.
-Make small even balls of the mixture in your palms.Slide them in the hot oil on medium heat.(Don't overcrowd the wok/kadai.)
-Wait till the balls get evenly cooked and browned,drain on paper towel.Repeat the same till you finish.
-Serve warm with ketchup !!!


Servings 20 rice balls

NOTES
* Slightly over cooked rice serves best for this recipe as its easy to mash with hands.
* Don't make the balls too big as it will be difficult to get it cooked properly.

Saturday, June 21, 2014

Nellikka & Lololikka(Loovika) Uppilittathu | Pickled Gooseberry & Indian Coffee Plum

The name of lololikka(loovika) was very uncertain until I found this website where the author says its botanical name is scram berry.Am not pretty sure about the name,anyways Keralites might be aware with Malayalam name.When I was in Kerala,I got these loovika from one of our good neighbours and the season had almost finished and so just could get a few bright colored ones.I immediately preserved it as pickle as I love these very much.Gooseberry(amla) is familiar to all and doesn't require much explanation.And so this had been in my drafts for months now and finally out today.As the process for making pickle in both are same,so listed them under one recipe.Hope you all enjoy this simple recipe with no oil ,enjoy making and relish it with your favorite meal !!!


Bird's eye chilly(kanthari mulakku) on left and scram berry(loovikka )on rt.

Ingredients
loovika(scramberry)2 cups/gooseberry(amla) 2 cups
water 3-4 cups
green chillies /kanthari mulaku(bird's eye chilly) 10 vertical slit
salt 1/2cup


Method
-Wash the loovika(scram berry) or gooseberry and pat dry.Remove any stalks if present.
-Heat a kadai or sauce pan with water and add salt.Let it come to boil for 5 minutes,add the vertical slit chillies.
- Switch off flame and add the loovika or gooseberry immediately(if you wish to use it at the earliest and plan to finish soon) else cool the mixture completely and then add the gooseberries in it for better shelf life .
-Leave to cool completely before storing in air tight bottles.Start using after 5 days minimum so that the berries turn soft and tender with the salt and spice seeped in.

Photographed after 10 days of pickling

NOTES
* These gooseberries are perfect thirst quencher on a hot summer day.Pop one in the mouth and drink water to feel the difference.
* Gooseberries when perfectly done swells up and the skin lightly peels off.
* Kanthari mulakku(bird's eye chilly ) works best but you can always use other green chillies too.
* There is no other preservative like vinegar added so always use clean dry spoon to take the pickle and leave the cap tightly closed after each use.

Photographed after 5days of pickling
Love it with a glass of water !!!

Friday, June 20, 2014

Chemmeen(Konju) Theeyal | Kerala Style Prawns(Shrimp) Curry

Prawns curry (Chemmeen Theeyal) is one of the best theeyals prepared by my mom along with another recipe which I posted long time back, ulli (shallots)theeyal.This recipe is also my mom's best preparation with prawns too.We as kids always devoured more rice that day whenever this dish was prepared.So,this is my favorite too till day with hot steaming rice.Theeyal always tastes best when it has all the flavors(spice,sour & salt) in a balanced form and its always a thick roasted coconut gravy with it.Though its lent time for us,but these are few of the non veg drafts that am posting.If you love the spicy,tangy flavors give this a shot,am sure you will fall in love with this dish !!!


Ingredients
large prawns( halved ) 20(refer notes)
shallots halved 15
coconut sliced 1/3 cup
green chillies 3-4
tamarind gooseberry size
salt
curry leaves few
oil 2 tbsp

to grind
coconut grated 1/2 cup
coriander powder 1 1/2 tsp
chilly powder 1 tsp
turmeric powder 1/2 tsp


Method
-Wash ,de vein & clean the prawns and drain the water.Keep aside.
-Heat a pan and fry the grated coconut till golden brown on low medium heat.Add the spice powders on low flame and put off flame.(See here for steps)Grind this in a mixer or blender until smooth.
-Soak the tamarind in 1/4 cup water.Squeeze out the pulp and keep aside.
-Heat oil in a pan ,fry the coconut pieces till lightly browned.Saute the shallots along with curry leaves till translucent.Add the green chillies.
-Add in the tiger prawns and saute for 1-2 minutes.Add in the ground mixture,salt.Cover & cook for 10 minutes.
-Add the tamarind pulp and adjust salt.Cover & cook again for 2-3 minutes till the oil starts to appear on the surface & the gravy thickens.
-Serve hot with steamed rice or even chapathis!!


Servings ~ 2-3 adults

NOTES
* The tiger prawns can be cut into  half and used.Otherwise if you are using the large ones,no need to cut these.
* The procedure of frying the coconut till golden brown is given here,check that out !!!


Check out other theeyal recipes if interested,
Pavakka /bitter gourd theeyal
Mushroom theeyal
Okra /vendakka theeyal

Wednesday, June 18, 2014

Mango - Biscuit Pudding (Using Agar-Agar)- A Guest Post for Aara

When Aara @ Sweets & Spices invited me to do a guest post for her space,I was very delighted.She is a new friend to me in the blogosphere but a constant reader of my space ever since we met here.She is from a foodie family and hails from Chennai,India.She is a very fascinated cook and jotts down the recipe with all minute details which any beginner would love to read and learn.She gets fair chances to use her kitchen to experiment recipes of which some are her own,some from online sources and friends.I had a chance to peep in her space and liked few of her creations namely egg cubes(false paneer),mutton karahi-lahori street style, elaichi pista kesar lassi,chatti pathiri and almond carrot cake(eggless).Do visit her space if you haven't been there to take an elaborate tour to this dedicated blogger's space.


Coming back to today's guest post.As always I love to celebrate the guest posts always with sweet desserts and so does this post.Mangoes are in season and its one of my favorite fruits as well.And so,I started trying out my list of mango recipes.This is one recipe which I have modified and fitted to our taste buds.Though I jotted down this mango agar pudding recipe sometime back (source;don't remember) but adding biscuits for base was my instant idea and I think that worked out good and you had to be here to fathom how excited I was as playing with agar agar had been my first experience.It as a stupendous moment to see the silky smooth dessert set up really good.I made it for one of our get together and I had just this last piece left out to capture the shot.I added chocolate sauce on top which is strictly optional.You can always mix match your ideas to present it well.Do give it a try if you love mangoes and am sure anyone would say 'no' to it. Over to Aara's space for the recipe details,cya there :)


Monday, June 16, 2014

Cheddar & Sage Scones : Baking Partners Challenge June 2014

Baking Partners this month are ready with another beautiful bake and this time unlike all sweet bakes,here comes a savory treat.There were two recipes suggested by Archana @ Mad Scientist's Kitchen -a tart and a scone.I preferred the scones as kids don't prefer baked tomatoes much and as the scones had tomatoes.I followed the exact recipe as it was beautifully explained.Thanx Archana and Swathi for opting this wonderful bake and they turned out excellent.I was happy to see that two of them just vanished soon after the bake when it were warm.I had to hide the rest to capture some pics or else would have to try again.Do give these a try and am sure you would feel happy about baking a savory scone filled with butter and cheese flavor !!!


Adapted from bbc good food.com
Ingredients
*self rising flour 225gms (2 cups)
english mustard powder 1.5 tsp
a pinch of pepper
*cheddar cheese 100gm (nearly 1 cup)
*dried sage 1.5 tbsp
butter,cold & cubed 1/2 stick (50 gm)
butter milk 150 ml or {whip curd/yogurt 100ml (1/2 cup)+water 50ml (1/4 cup)}
oil 1 tbsp for greasing


Method
-Whip the curd with water listed to make thin buttermilk.Keep aside 1 tsp of buttermilk to brush the scones.
-Pre heat oven to 220 degrees C or 425 degrees F.Grease and flour the baking tray (8" round/square)
-Sift the flour twice,add the mustard powder and pepper powder.
-Add the butter & add 1 tbsp sage.Rub butter in the flour till it resembles crumbs.
-Add in half of the cheese and mix well.Make a well in the center of the flour and add butter milk till the flour come together sticky.Transfer on a clean floured surface and shape in a round of 3cm thick.
-Transfer this to the prepared tin.Cut out quarters and then redivide in  quarters.
-Brush the top with reserved butter milk and then add the remaining 0.5 tsp sage.
-Add the remaining cheese on top.


-Bake at 220 degrees C or 425 degrees F for 15- 20 mins until golden,risen, and sound hollow when tapped at the bottom.(Mine was done at 18 minutes.)
-Remove from oven,cool on wire rack and gently run a knife in the existing cuts to separate scones.Serve warm with butter.

Servings~ 8 scones


NOTES
* I preferred making my own self rising flour.You can mix 1 cup of all purpose flour(maida),1.5 tsp baking powder and 1/2 tsp salt.(referred recipe here)So,for this recipe you require 2 cups all purpose flour+3 tsp baking powder +1 tsp salt.swift it twice so that there is even distribution of baking powder and salt and the flour is well aerated.But I preferred to use 1/2 tsp salt as cheese already has salt in it and that was perfect to our taste buds.
* The recipe calls for mature cheddar cheese but I used sharp cheddar cheese.Use as per tastes.
* You can use 8 fresh small sage leaves for topping instead of dried sage.


Friday, June 13, 2014

Whole Wheat Almond Biscotti (Step by Step Pics)

Whole wheat flour & almonds sounds healthy right?? I bet anyone would say no to such an energy packed biscottis( perfect for all age groups).Now adays,I have tried adapting good changes in baking preferably using whole wheat flour wherever possible and avoiding bleached flour as much as possible.Whole wheat has its own difference in the texture and it appears to be denser especially in cakes but when in biscottis doesn't make much difference in the texture and tastes really good.I had tried these whole wheat biscotti sometime back for one of our good friend who had gestational diabetes for her baby shower.Everyone had good remarks and however,I couldn't take snaps that time.Almonds provides healthy fats and lowers blood glucose levels.They even lower bad cholesterol and there are many more health benefits as you all know.Do give this a try and my family loved this recipe a lot !!!


Ingredients
whole wheat flour 2 cups
toasted almonds 3/4 cup
sugar 1/3 cup-1/2 cup
eggs 2
olive oil,pure 1/4 cup
vanilla extract 1 tsp
honey 2 tbsp
baking powder 1.5 tsp
salt 1/4 tsp

For chocolate dipped biscotti(optional)
6 ounces of semi sweet or bitter sweet chocolate


Method
-Preheat oven to 350degrees F and line a tray with parchment paper.
-Toast the almonds whole or blanched 7-10 mins until lightly done.Chop it coarsely and keep aside.
-Sift the whole wheat flour,baking powder,sugar,salt.
-Gently stir in the eggs,vanilla extract ,coarsely chopped almonds,honey and olive oil.Mix with your clean hands,till  the dough becomes sticky and comes together.transfer to a lightly floured surface and shape it into two 7" logs.Transfer this unto a baking sheet with parchment paper widely placed and then flatten it slightly to 3" wide.(flatten 4" if you wish a thinner biscotti)
-Reduce oven temperature to 300 degrees F and then place,bake for 30-35 minutes until the logs puff up and spread ,lightly browned.(see pics)
-Remove from oven and cool on wire rack for 15 mins.Transfer on a cutting board and using a serrated knife,cut 1/2" thick biscotti.Place them on the baking sheet and bake again for 10 mins.Remove from oven and gently flip the other side,bake again for 10 mins.
-Cool on wire rack completely and store in air tight containers.


FOR CHOCOLATE DIPPED BISCOTTI(optional)
Place 4 ounces of chocolate in a heat proof bowl and double boil this over simmering water.Wait till the chocolate is melted and then remove from  heat.Add the remaining chocolate (2 ounces) and mix thoroughly to get smooth chocolate.Pour the chocolate in a cup and dip each biscotti at one end.Place it on a parchment paper lined sheet.Once all have been done,refrigerate the tray for 15minutes until the chocolate is hardened.(I used only 3 ounces made half just for kids,remaining were left out as it is)


Servings ~30 biscotti

NOTES
*The recipe is adapted from here & here,but modified.
*If you plan to use all purpose flour or maida then use 1 tsp of baking powder instead of 1.5tsp.
* You can chop the almonds much smaller than I did as this helps the dough to come together much easily and helps preventing crumbs when cutting the biscotti after first bake.
*If you wish a more crispier biscotti,go ahead and bake for 15 mins in the second bake.Stays longer too.


Thursday, June 12, 2014

Palak Cheera Parippu Curry | Spinach Dal

Spinach Dal (Palak cheera Parippu curry) is a simple yet healthy curry that can be served with chapathis or rice.The spinach leaves add iron and dal is rich in protein and they both a great combo.I frequently make this curry as we love this combo.Kids love to squeeze a quarter piece of lime and then enjoy.This can be made without many efforts.The leaves should be cleaned well to remove dirt and the leaves should be checked well for any worms too.Always wash the leaves before chopping.You can even add the spinach leaves with the dal and cook.But I prefer to do the below method as that helps to retain the leaves in shape than previous mentioned.You can use whichever is comfortable and try !!


Preparation time ~20 minutes
Cooking time ~ 30 minutes
Serves~5
Ingredients
tuvar dal (sambar parippu) 1/4 cup
split moong dal 1/4 cup
turmeric powder 1/2 tsp
salt 1/2 tsp

palak/cheera half of a bunch or 1.5-2 cups chopped
onion 1 small chopped fine
tomato 1 finely chopped or purée 1/2 cup
ginger chopped 2 tsp
garlic chopped 2 tsp
hot chilly powder 1/2 tsp
cumin seeds 1/2 tsp\
garam masala 1/2 tsp
salt to taste
oil 2 tbsp

for tempering
red dry chillies 2 broken
curry leaves, 2 sprigs
Kashmiri chilli powder 1/2 tsp
asafoetida (hing) a good pinch  
ghee 1 tbsp


Watch on YouTube -


Method
  • Wash the spinach leaves under running water until clear.Chop the leaves in small and keep aside.
  • In a cooker, add the washed tuvar dal and split moong dal.Add double the amount of water, turmeric powder and light salt.Pressure-cook the dal for 3–4 whistles and wait till pressure releases.
  • Now, heat another pan and add oil.When oil is hot, add cumin seeds, wait to sizzle.Then, add in chopped ginger and garlic, sauté until the raw smell disappears and lightly crisp.Finally, add in chopped onions and curry leaves.Sauté until translucent.
  • Add in the hot chilly powder.Sauté until the raw smell disappears on low flame without burning.Now, add in the chopped spinach leaves and tomato.Sauté until the spinach leaves are wilted.Cook covered for 5 minutes.
  • Then, add the cooked dal and let the mixture come to a boil.Add 1 cup water and adjust salt as required.
  • Cook covered for around 7–10 mins on medium flame until the dal cooks, mashes and gets blended with the cooked spinach.(Give a stir in between so that the dal doesn't get burnt at the bottom and leave the flame on low medium).
  • Heat a pan for tempering. Add ghee and ad in broken red chillies, followed by curry leaves and Kashmiri chilli powder. Switch off flame and add a pinch of hing (kayam podi). Pour the tempering over the cooked dal and leave covered for 5 minutes. Mix and serve.
  • Switch off flame and serve warm.Squeeze half of a lime when serving if you love it tangy or just like that.


NOTES
* If you wish to make the gravy thicker and flavourful, you can grind grated coconut(1/2 cup) with cumin seeds(1/2 tsp) and a garlic clove to a smooth paste.Add this to the dal mixture on low flame, simmer for two minutes and then serve.I haven't added ground coconut paste, as we love it this way.
* Add 1/2 tsp mustard seeds too in the tempering if needed.
* Add chopped coriander leaves too if you like that.
* You can use one da and prepare too, in that case use 1/2 cup of a dal for this measure.
* You can add the spinach leaves and dal together to the pressure cooker, I prefer cooking separately as this tastes better.


Wednesday, June 11, 2014

Upperi Kappa Varuthathu | Kappa Chips & Kappa Podi | Traditional Tapioca Chips (Kerala Style)

Upperi Kappa /sun dried tapioca  is a traditional recipe of Kerala.This particular recipe has many nostalgic memories associated with it and so you can imagine my attachment to this recipe.Our great grandparents reserved the fresh tapiocas in the forms of upperi kappa,vatta kappa and many other forms to use it through out the year when there was no fresh tapioca available after the season ends.That's how this recipe was researched out in their time and was carried on to generations.This is then fried in oil and munched whenever needed.Upperi kappa is worth while of all the efforts done.Nowadays,people hardly take time to preserve this at home and rather buy tapioca chips from bakeries.But my mom still does this just to recreate the old tastes and so,I had bought these specially prepared packet of upperi kappa with me when I packed my baggage.Its difficult to find such products here,but whoever can try this recipe will definitely love it !!!


Ingredients
upperi kappa(see notes)/tapioca  3 fistful
grated coconut 1/2 cup
sugar granulated 3tbsp(as needed)
cardamom powder 1/2 tsp
oil to deep fry

Method

Upperi kappa before frying

PROCESS OF MAKING UPPERI KAPPA
- Mom made these upperi kappa at home.It is a long process,by first peeling the thick brown and pink skin of the tapioca.Then chop it small and thin( or cut in big pieces and once you boil,remove and then cut length wise in thick pieces).Wash 3-4 times under running water until the water runs clear.Then,the tapioca is brought to a boil with water,wait till it becomes half tender.Immediately drain the tapioca using a slotted spoon and colander.Leave in the colander till the water is drained out.Spread this on a plastic sheet/mat outside in the sun,its brought back at dawn and repeated every day until it becomes dry,shrinked and crisp( see the pic above). Store in airtight bags for 6 months.


 MAKING CHIPS -
Heat a wok/kadai with oil .Wait till its hot,slide in the sun dried tapiocas/upperi kappa and keep turning all sides till it becomes crisp and lightly browned.Drain on paper towel and then sprinkle little salt.Serve warm or make this recipe below to enjoy the tapioca powder/Upperi kappa podi just like avalose podi.

MAKING KAPPA PODI-
If you plan to make podi,then transfer it to a jar and pulse 6-7 times in a blender until its coarsely done. Add in the sugar,grated coconut,cardamom powder.Mix well with hands and enjoy with tea.


You may also be interested to try tapioca chips, the link is here.

Monday, June 09, 2014

Amritsari Fish Fry

Amritsari Fish Fry is a popular recipe among sea food lovers esp in Punjab and worldwide.It is definitely a must try recipe.This recipe can be used as a starter or as side dish.I have adapted this recipe from 'Turban Tadka'  by chef Harpal singh Sokhi.He has beautifully explained this dish and hence,I tried this at home.Do give this a try if you wish to have a chatpata pakoda style fish !!

Ingredients
1.boneless fish 600gms (more than 1 lb)
   lemon juice 1tbsp
   red chilli powder 1 tbsp
   ginger paste 4 tsp
   garlic paste 4tsp
   salt to taste

2.malt vinegar 1/2 cup
   gram flour/besan 1 cup
   ajwain/carom seeds 1tbsp
   egg 1
   thick yogurt 1/2 cup
   rice flour  2 tbsp

 3.oil to deep fry
 4.chat masala (optional)

marinated fish on left and inside of fried fish rt.
Method
-Wash and clean the fish under running water.Pat dry.
-Make a paste using the ingredients listed under 1.Leave aside for 1/2-1 hour.
-Add the ingredients listed under 2 and make a thick paste.
-Marinate and leave for another 15 minutes.
-Heat a wok/kadai and deep fry these fish pieces till crisp and cooked.Drain on paper towel and serve as starter  with a sprinkle of chat masala or side dish.


NOTES
* You can use any boneless fish.I have used salmon fillets.Try cutting the pieces slant,small and thin.
* Shallow frying will not yield this color,keeping in mind the healthy part of view you can always opt this method.
* Malt vinegar with its pungent full bodied flavor makes it popular for seafood dishes.But you can always use other vinegar too.


Friday, June 06, 2014

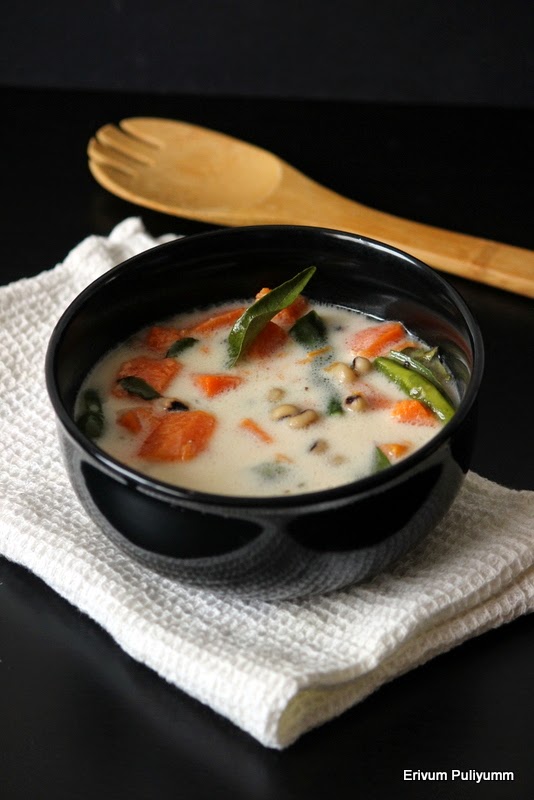
Olan | Vegetables in Coconut milk | Sadya Menu

Olan is a traditional Kerala dish prepared with coconut milk and is usually served in sadyas.The flavors are very subtle and is perfect as a side dish with other spiced curries.Olan can be prepared using pumpkin or ash gourd or both.Traditionally cow peas(vanpayar) is used for making this dish but here I have used black eyed peas.Try preparing this dish and enjoy the real authentic flavors of kerala with the tinge of coconut oil !!


Ingredients
black eyed peas 1/2 cup soaked overnight
diced pumpkin 2 cups
green chillies 4 vertical slit
thin coconut milk 2 cups
thick coconut milk 3/4 cup
coconut oil 1tbsp
salt to tsate
curry leaves a sprig


Method
-Cook the black eyed peas in a pressure cooker upto 3 whistles with salt or till tender.
-Cook the diced pumpkin with thin coconut milk,green chillies and salt till tender(takes about 5-7 minutes;don't overdo otherwise it will get mashed up).Adjust salt.
-Drain the cooked black eyed peas from the cooked water.Discard the water and add the black eyed peas to the cooked pumpkin cubes.
-Mix the thick coconut milk on low flame and wait till 1 or 2 bubbles appear at the surface.Switch off flame  and pour the coconut oil,sprig of curry leaves.
-Keep covered for 10 mins so that the flavors blend well,Serve warm !!


Servings ~ 6 people as side dish

NOTES
* You can use cow peas /vanpayar instead of black eyed peas.
* You can use ash gourd instead of pumpkin or use both half in quantity.
* Ensure that the vegetables are not overcooked.
* Draining the cooked peas water is to retain the pure white color of olan.