Pages

Thursday, August 28, 2014

Mini Cherry Pie (Step by Step Pics) | How to make pie crust from scratch??

Cherries are in season now and so caught hold of these cuties to prepare this scrumptious pies.Pies/pastries are my kids favorite any time and this time,I tried out these mini versions with cherries.This is handy and can  be easily served as individual portions.They liked (loved) this a lot and have demanded for more next time.These have a pastry like texture with the sweet cherry filling.I have tried a few recipes with cherry in  the previous years(listed below).You can prepare the pie dough well in advance and can be freezed or refrigerated.This will make the work easier.Do give this a try and enjoy !!


Adapted  joy of baking and here
Ingredients
for pie crust
all purpose flour 1 1/4 cup
butter 1 stick;cubed(113g)
sugar 1 tsp
salt 1/4 tsp
cold water 1 tbsp-3 tbsp

for filling
fresh cherries 2 cup
corn starch 2 tbsp
butter 2 tsp
sugar 1/4 cup
lemon juice 1 tsp
vanilla extract 1/2 tsp
salt a pinch


Method
for pie crust dough(holds good for 1* 9" pie pan)
  • Sift the flour,salt and sugar until combined well.Add in the cubed butter and pulse if using a blender or food processor or using your hands,mix until the mixture is crumbly in texture.Pour water in the crumbled mixture so that the dough comes together when pinched(not a solid smooth ball).Transfer this onto a lightly floured surface and bring together to form a ball.Flatten this in a 5" circle and then cover with a cling wrap.Refrigerate for 30 minutes until its firm enough to roll out.


for making filling
  • Wash and pit the cherries,cut in half.Mix the sugar,salt,corn starch,vanilla extract,lemon juice.Mix it well and let it sit for 10-15 minutes until its coated well.


for final assembling
  • Pre heat oven to 400 degrees F and keep a muffins pan ready.
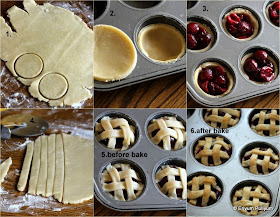
  • Uncover the cling wrap and roll out the refrigerated dough on a lightly floured surface until 1/4 " thick.Using a 2 1/2 "-3" cookie cutter/lid ,cut out round shapes.Place these round shapes in the muffin cups by snuggling placing the edges.Place each cut out rounds in each cup.With the remaining dough,roll it again and cut out thin strips.
  • Place a tbsp of filling in each and then using each strip place on top to give a cover/lattice.
  • Place and bake at 400 degrees F for 25-30 mins.Cool down completely and then using a knife run through the edges and scoop out on  a plate.
  • Enjoy as a dessert or just like that !!


Servings ~6-7 pies


NOTES
*Double the quantity of pie crust dough and filling to makes 12 mini pies or you can make 1 large pie of 9" size.
* You can prepare the pie dough and can freeze over a month.Thaw the dough in refrigerator overnight before using.

RELATED POSTS
Cherry Lassi
Fresh Cherry Tartlets
Apple Pie
Mini Cheese cake(no bake)


Tuesday, August 26, 2014

Barley -Oats Idli & Dosa (without rice) | Healthy Idli ~ Step by Step Pics

Have you wondered making idlis/dosas without rice? Frankly speaking,I hadn't given a thought unless I started blogging.But how about a barley-oats idli/dosa without rice ?? Though I have seen many barley idli recipes but all had rice in them and I wished to make a barley idli/dosa without rice.Then,I thought to give a trial n error myself.If the recipe clicks,then surely will be an added advantage to my family and a credit to my space too.Fingers crossed over the ground batter(left for fermentation)!! In the morning,I found the batter fermented nicely.Excitedly,I prepared idlis and presented to my family.


The idlis/dosas turned out so soft and moist that none could hardly make out the difference between regular ones.I asked my better half whether he knew what the idlis were made of and the usual comment was rice & urad dal?? !!And finally when I told him the secret ingredient was barley and oats,he was very happy.The only difference I found is that the regular idlis were much brighter in color and barley oats idlis are light brownish white color.Barley is known to reduce blood sugar levels,lower cholesterol and helps in weight loss.On the other hand,oats are very rich in fiber and has many of the above properties as barley too.I have tried this recipe 4 times by now and for a change I made dosas too with the same batter,came out well. You may be wondering the reason behind my writing so much,I just wish all of you to try these soft idlis/dosas.Enjoy !!!!


Barley -Oats Dosa

Ingredients
barley 1/2 cup
oats 1/2 cup
whole urad dal(gotta) 1/3 cup
baking soda a good pinch
salt to taste


Method

TO MAKE BARLEY-OATS IDLIS
  • Wash the barley under running water 3-4 times and soak the barley with enough water.Wash the urad dal and soak in water.Add oats in third bowl,add just enough water to soak the oats.Don't add too much water for oats as the water can be drained easily once soaked.Soak barley for 6 hours; oats & urad dal for 2-3 hours.
  • Grind the barley with minimal water and add oats to it when half done.Grind it smooth.Add the urad dal and grind again to smooth consistency.


  • Mix the batter well and ferment for 7-8 hours.Add salt and pinch of baking soda just before preparing.
  • Grease an idli mould with oil/ghee and pour ladle of batter in it.Steam cook the idlis for 8-10 mins until cooked.
  • Remove from cooker and let it cool.Using a spoon scoop out the idlis and serve warm with tomato chutney or idli milagu podi !! 

TO MAKE BARLEY-OATS DOSA-
  • Grind the batter slightly thinner than the idli batter with same ingredients and leave for fermentation just like for idlis.
  • Heat a non stick pan /iron griddle.Pour laddle of batter spread it smoothly.Drizzle a tsp of oil on top.Flip both sides until lightly brown and crisp.
  • Serve hot with chutneys !!

 Servings~ 16 idlis


NOTES
* You can double the quantity and prepare much larger quantities or reduce to prepare smaller quantities.Just keeping the ratio same.
* I usually add salt after fermentation but you can always mix it when placing for fermentation.
* Use minimal water to grind the ingredients if you are planning to make idlis.If you plan to make dosas then the batter consistency can be thinner. 
 * Adding baking soda is optional,but makes a very light soft idlis.If your batter is very well fermented,then skip this.


Monday, August 25, 2014

Sharkara Varetti (Sarkara Upperi) | Sweet Chips | Sadya Dish ~ Step by Step Pics

Sharkara Varetti or sharkara upperi is an inevitable dish in the sadyas; especially Onam & Vishu sadya.A piece or two along with upperi is the first one that I grab from the served ela(banana leaves)for sadyas.This recipe is a long awaited wish to try at home,although I have had lots prepared by my mom.But somehow didn't have the confidence to try,hoping I may not get the right ones.But am very happy that I got it right at my first attempt though every piece of it got over before Onam.I think will have to make this again for Onam.The secret of making this recipe lies behind getting the chips nicely cooked inside and crispy outside,browned evenly and getting the correct consistency syrup.Do give it a try and am sure you will be happy making these at home for this Onam !!


Adapted TV show & mom's notes
Ingredients
for frying chips
raw plantain 2 large or 3 medium;1/2" thick cut pieces
water
turmeric powder 1/3 tsp
oil 2" deep for deep frying(coconut oil preferably)

for making pani/jaggery syrup
sharkara/jaggery preferably dark colored 1cup or 4 cubes
water 1/4 cup
cumin powder 1tsp
dry ginger powder/chukku podi 1 1/4 tbsp
cardamom powder 1tsp
* granulated sugar powdered 3 tsp / boiled rice powdered 3 tsp


Method
for making chips
  • Wash,peel the skin of raw plantain by making a slit and pulling apart the skin just like for making upperi(oil your hands when doing to prevent staining).Then,keep a large bowl with water and turmeric powder added or use kanji vellam (cooked rice water).Dip the peeled plantain in the water for 15 minutes.Cut the peeled plantain by dividing vertically and then cutting horizontally in 1/2" thickeness evenly.(Note that all pieces should be evenly thick or else one piece will become crispy n brown earlier and the thicker ones will take time)Keep on a paper towel to drain any excess moisture.
  • Heat oil in a kadai/wok and when its hot.Put the flame on high when you slide in the sliced plantain pieces,then reduce immediately to low flame.Keep stirring occasionally so that it gets evenly browned and doesn't stick to one another.(takes about 15-20 minutes for 1 batch,I fried in 2 batches)
  • When all the pieces have evenly browned then drain using a slotted spoon and drain in  a steel colander preferably(I didn't have a steel colander so used paper towels.)Leave to cool completely.

for making sharkara pani(jaggery syrup)
  • Powder the granulated sugar and keep aside.(I usually add cardamom along with this to powder it well.) OR My mom usually fry about 3-4 tbsp of boiled rice in a pan until lightly browned and then powder this rice in a blender jar to smooth powder. You can use white idiyappam podi store brought too but it may make te sharkara varetti coated white in colour rather than that brown shade. So its better to use fried boiled rice. USE POWDERED SUGAR OR POWDERED BOILED RICE, I prefer boiled rice than sugar but as a quick fix use sugar as well.
  • Heat a non stick pan with 1/4 cup water and add the jaggery cubes to melt.When it melts completely,sieve for any impurities.Put the syrup back on flame.The mixture gets frothy and gets thicker in consistency,wait till it gets one string consistency.(Checking consistency-Hold a drop of sour in between thumb and index finger,if it pulls out as a string,that is one string consistency.OR Pour a small drop in  a bowl of cold water to check,if the drop turns thicker in water then the syrup is ready)Add cumin powder and half of the powdered sugar,cardamom powder,mix well.The flame should be low medium else it will get burnt at the bottom of the pan.
  • Add in the fried plantain chips,mix well.Switch off flame and move away the pan from heat.
  • Add in the chukku podi /or dry ginger powder,mix well.Now add the remaining powdered sugar little by little and giving a quick toss.Soon you will see the jaggery gets nicely coated and gets dried up once you finish adding the sugar,keep mixing well unless its dried up well.
  • Cool down completely before storing in containers.I made a small batch and so had no left overs,finished before Onam.You can make large batches and store over a month.


Yields 70-80 pieces 
NOTES
* You can even add powdered parboiled rice mixed with powdered sugar to get the right consistency,my mom does that way.I have added only powdered sugar.
* The raw plantains should be matured enough(moothathu/vilanjathu) to prepare this recipe but at the same time shouldn't be ripe ones.
* The fried plantain chips should be drained off excess oil and cooled down completely before you mix with the jaggery syrup.
* The consistency of the syrup is very important else the pieces may not get good coating.
* The powdered sugar coated one may not remain crunchy for long and so use powdered boiled rice or idiyappam podi(roasted white rice flour) if you would like to store longer(refer above in steps).

For more sadya dishes,click here.

Saturday, August 23, 2014

Green Chilli Chicken | Green Chicken & Chillies for Saturday Snapshots !!

Here's,introducing a new enthusiastic group of amateur photographers who have started to learn from each other(from experiences and practicing,shooting different subjects at different angles and composition). Frankly speaking,am a novice to this aspect and still stabilising my hands on my camera.But am enthusiastic about learning the different aspects of photography and I feel am in the right track joining Shweta & Siri's Saturday's Snapshot group.Thank u gals for the wonderful thought and this week that task was to get hold of chillies(red,dry,green or any).I chose the green ones and thought to give a try on green chilly chicken too.Though I wished to try this recipe with kanthari mulakku(bird's eye chilly) but couldn't get any here.If you can get those chilies then its better to use that,gives more flavor but make sure to adjust the spice as per tolerance.The recipe is adapted from here and this is a flavorful greeny chicken curry with the flavors of cilantro and mint leaves.Hope you guys give it a try and enjoy my green chillies shots too !!


Ingredients
to marinate
chicken: 500 gms
pepper powder: 1 tsp
garam masala: 1 tsp
turmeric powder a pinch
salt

for gravy

onion 1, chopped fine
butter 1-2 tbsp
yogurt/curd 1/2 cup
curry leaves 1 sprig

to grind
coriander leaves 12-15 sprigs
mint leaves 1/2 bunch
curry leaves 1 sprig
green chillies 10
onion 1, chopped.
ginger-garlic paste 2tsp


Method
-Wash and clean the chicken under running water.Marinate using garam masala,pepper powder,turmeric and salt.Leave for half an hour.
-In the meantime,grind the ingredients under the grind list to a coarse paste.
-Add this green paste to the marinated chicken.Leave for 10-15 minutes.


-Cook the chicken with green marinade for 10-12 mins until the chicken is half cooked and coated with spices.(If required add half cup water)
-Heat another non stick pan,add butter.Saute the onions and curry leaves once butter is melted.
-Add the cooked chicken with gravy and cook for 2 mins.Add yogurt on low flame and cook covered for another 5 minutes.Adjust salt.
-Let the gravy thicken for another 3 mins and then turn off heat when butter appears floating on top.
-Serve warm with rice/ rotis !!!


NOTES
* Butter is a must to this recipe as it tastes flavorful than oil.
* Adding green chillies is as per tolerance.I added 10 green chillies which yielded a moderately spicy chicken but you can always alter this number.
* Add a pinch of turmeric powder only else you will not get the bright green color.

RELATED POSTS
Dragon Chicken
Honey Chicken
Badami Chicken
Spinach chicken
Kerala Chicken Roast


Linking this to Saturday Snapshots -Week 2 fun hosted by Shweta@ Merry Tummy & Siri@  Siri's Food

saturday-snapshots-logo

Thursday, August 21, 2014

Pineapple Juice

Pineapple is one tropical fruit which is a family favorite here.Pineapple is rich in vitamin C,manganese and thiamine.This fruit is also rich in fiber and perfect for digestion.Pineapple is also considered world's healthiest foods after banana.I have earlier posted a pineapple mint cooler but this is loved by kids equally.They love juice than milk based shakes or smoothies.A simple recipe,blend ,chill and serve !!!


Ingredients
half of a large pineapple(about 2 cups)
water 1/2 cup
sugar as desired
ice cubes few


Method
  • Wash and peel the skin of pineapple.Remove the eye or the thorn like round things with a knife.Cut and dice the pineapple.Discard the core.(or make use of peels & core to make pineapple wine)


  • Add this to juicer or blender with sugar and water.Blend until smooth.
  • Strain the juice and add ice cubes.Serve chilled.


Servings~ 3 cups

NOTES
* I haven't mentioned the amount of sugar as you can always add as per your sweet tooth or even omit if pineapple is sweet enough.

RELATED POSTS
Pineapple Pastry(Eggless)

Tropical Muffins
Pineapple Pullissery
Pineapple Cobbler

Tuesday, August 19, 2014

Kallappam (Vellayappam) -Step By Step Pics | Rice Pancakes (without Yeast/ Baking Soda)

Appam without yeast?? Yes..u heard me right.These appams are known as "kallappam" meaning appam made with kallu(toddy).Kallappams are soft appams made at our place regularly as other appams like paalappam and is relished with some chicken stew or spicy chicken curry.We also call this appam as 'vellayappam' too but at my husband's place paalappam(laced appams) is known as 'vellayappam'.Anyways the best name to this appam is kallappam.Kallappam is also served for St.Gregorious perunnal(feast) in our churches as nercha(offering) with kozhi curry.


Coming back to the recipe of kallappam,now the next question arises-how did I get hold of toddy(kallu) in US? Yup,dt's true.. I made kallu at home but with coconut water(recipe below).Toddy(kallu) is one of the traditional and local drink extracted from coconut trees or palm trees in Kerala.When the coconut tree flowers are just budding,the coconut tree climbers(thengu kayattakaran) would reach the bud,make a hole where a white liquid oozes out and tie a pot to collect. Every morning, they fetch the kallu (toddy) from these trees and fermentation starts immediately.

In olden days, toddy(kallu) was used in leavening vellayappam, paalappam or vattayappam and yielded very nice results.My mom & grandmother used to prepare the kallu from coconut water collected from coconuts and that's how I learnt making this kallu (fermented coconut wine).But now days yeast is readily available and so no one bothers to make this kind of appams using coconut water and making appam.However, I love the flavour of these appams very much and is much better for health.You still can make this kallappam with yeast.So, enjoy this appam !!


Ingredients
plain rice/pachari 1.5 cups
grated coconut 1 cup
coconut water 1/2 cup 
sugar 1.5 tbsp
cumin seeds 1/2 tsp
shallots 3-4
cooked rice 2 tbsp
salt 1/2 tsp


Watch on YouTube -


Method
TO MAKE FERMENTED COCONUT WINE
  • I Method -In a clean dry bottle, pour the coconut water and sugar.Shake well and leave undisturbed for 24 hours.The mixture gets cloudy and sweet, intoxicating fermented coconut wine(kallu) gets ready.If you leave it longer, it becomes sour and it turns vinegar.Discard the mixture if, as it yield turns vinegar, it yields sour appams and causes acidity.If making this way, then add only 1/4 cup of the fermented mix.
  • II Method - Add the coconut water to a bowl and add sugar, mix to dissolve. Leave undisturbed for 4–5 hours. This will make a less fermented version but when added to the ground mix, gets fermented nicely. In this method, use 1/2 cup of this mix. In the video, I have used this method.
(fresh coconut & fresh coconut water)

TO MAKE APPAMS
  • Wash and soak the rice in water for 3–4 hours.Drain the water and add grated coconut, cumin seeds, cooked rice, shallots and the kallu in a grinder and blend until smooth.If you are using a mixer, then grind all separately and use kallu (or fermented coconut wine) instead of water for grinding.Make a thick better as for thick dosas.
  • Add salt to the batter and leave for 6–8 hours to ferment.After 6 hours, the batter rises but not like the yeast batter though, gently mix up without deflating the air much.


  • Heat a non-stick pan and add a ladle of batter when tawa/pan gets hot.Cover the non-stick with a lid or plate to get cooked.You'll find bubbles start appearing at the surface and break.The white batter turns off-white and gets cooked.(takes about 1 minute)
  • Slide a spatula and remove to a plate (no need to flip the other side as it gets cooked when covered). But if you feel it to be flipped, then flip and cook for 30 seconds.Repeat the same steps to finish the batter.
  • Serve warm with chicken stew / chicken curry /egg curry/ beef mappas  !!
Servings~ 10-11 appams


NOTES
* You can add yeast instead of kallu (toddy) if you don't get hold of fresh coconut water.
* Use tender coconut for grated coconut. The texture of appams is very nice. Use only the white portion of coconut for the white colour of appams.
* These appams are off-white due to the fermentation process.
* Canned coconut water may not work good. Use mature coconuts water for best results.
* The amount of yeast is 1/2 tsp of active dry yeast for this amount of rice listed above if not using coconut water.

RELATED POSTS
Paal Appam
Traditional Paalappam 
Wheat paalappam
Vattayappam
Corn Ishtu
Fish Molly
Chicken Stew
Beef Mappas
Egg Curry with Potatoes


I made paalappams/vellayappam with kallu, pic below & recipe here-


Monday, August 18, 2014

Nadan Beef Mappas | Kerala style Beef cooked in Coconut milk

Beef recipes are always inviting for us, but we don't regularly use this meat. Whenever these recipes are prepared, my family will enjoy food to the core and will have tummy full.This is another tempting recipe with beef and a traditional one too from our state, Kerala.Beef Mappas is a stew like curry, almost similar.The only difference I find is that mappas uses vinegar & tomatoes, whereas stew is devoid of the tanginess (there may be slight difference in preparations depending on the local areas).Both tastes superb with paalappam or any appams.We had it with kallappam and enjoyed.You can even try other meats like chicken or mutton to make this dish and enjoy!!


Preparation time ~ 15 minutes
Cooking time ~ 20 minutes
Author ~ Julie 
Serves ~ 4
Ingredients
to cook beef
beef 1/2 lb(450 gm)
pepper powder 1/2 tsp
salt
 
to make gravy
whole spices (star anise1,cardamom pods2,cloves 3,cinnamon 1" stick)
onion 1 medium-sized, thin half moon sliced
ginger chopped fine 2 tsp
garlic chopped fine 1 tsp 
green chilly 3 vertical slit
tomato 1 small chopped
diced and cubed carrot 1 medium
diced and cubed potato 1 medium
thin coconut milk 1 1/2 cup
thick coconut milk 1/2-3/4 cup
coriander powder 2 tbsp
pepper powder 3/4 tsp
garam masala 1/2 tsp
coconut oil 2 tbsp 
vinegar 1 -2 tsp

to temper 
mustard seeds 1/2 tsp
shallots 2 sliced or chopped fine
curry leaves few 
coconut oil 1 tbsp

Watch on YouTube -


Method
  • Wash and clean the beef under running water 5–6 times or till the water runs out clear.Drain in a colander and then add to a pressure cooker with salt and pepper powder.Leave for 15–30 mins.Switch on the flame and then close the pressure cooker.Cook for 3 whistles or more till the meat is cooked and is tender.
  • Heat another pan and add oil.When it's hot, add whole spices and wait till it's fragrant.

  • Sauté chopped ginger, garlic and green chillies till raw smell disappears.
  • Add and sauté the onion until translucent.Add in the coriander powder, pepper powder, half of the garam masala and toss about a minute on low flame.
  • Add in the chopped tomatoes.Stir and then add cubed carrots, potatoes, give a quick stir.
  • Add the thin coconut milk and add salt lightly (as beef stock contains salt).Cook the veggies covered till half done.
  • Add in the beef with stock and cook covered again until the spices are blended well, and the gravy thickens slightly (Watch video for cooker style quicker recipe).
  • Add in the vinegar(I added vinegar while cooking beef in the video) and lastly the thick coconut milk on low flame.Add the remaining garam masala and turn off heat.
  • Heat oil in another pan to temper the mappas.Splutter mustard seeds and add in curry leaves, shallots.Wait till shallots turn pinkish brown in colour.Drizzle on top of curry.Cover and leave for 10 mins.Serve warm with paalappam, vattayappam,wheat paalappam, puttu or even chapathis.
Servings ~ 3-4 servings
NOTES
* You can decrease pepper powder as per your tolerance.
* Adding vegetables in a mappas is optional, but I love adding these to sneak in veggies to kids.You can make the same recipe without veggies.
* Chicken, fish or mutton in non veg and bread fruit(sheema chakka), okra(vendakka) in veg can be used to make mappas.Replace beef with any of the following lists and make your desired.


Friday, August 15, 2014

Pizza Muffins | Savory Muffins

How many likes for pizzzzaaaa??I know there are lot many including me.How about a pizza muffins or muffins that taste with the flavors of pizza?? Sounds interesting,ryt?Though I have tried making pizza at home(listed below) but this is a much simpler recipe and is a bit different from the actual pizza.Kids will love these smaller individual portions and this recipe makes it easier for large gatherings or kids play dates.This definitely is a crowd pleaser when topped with pizza sauce.Try out these small pops & Enjoy !!


Ingredients
all purpose flour 1 cup
whole wheat flour 1/2 cup
baking powder 2 tsp
italian seasoning 1/2 tsp
red bell pepper chopped 1/2 of 1 or 1/2 cup
jumbo olives,round sliced 1/3 cup
salt 1/4 tsp
cheddar cheese 1/2 cup
egg 1
milk 1/2 cup
oil 1/2 cup

topping
mozarella cheese 1/2 cup
pizza sauce or pasta sauce as required


Method
  • Pre heat oven to 375 degrees F.In a large bowl,whisk together flours,baking powder,italian seasoning & salt.make a well in the center.
  • Pour the oil,milk and eggs  in the well.Stir until just moistened.
 
  • Stir in the cheddar cheese,olives and chopped red bell pepper(Reserve 1tbsp each of red bell pepper & 1tbsp of olives).Divide among 12 muffins cups or oil sprayed muffin tray.

 
  • Top it with mozarella cheese,reserved red bell pepper and olives.Bake in pre heated oven for 20-25 minutes or until the tops are firm.(mine took 25 mins)
  • Cool on wire rack and run a sharp knife or spatula along the sides of muffin and gently remove on a plate.
  • Serve warm with pizza sauce !!


Serves ~ 12 muffins

NOTES
* You can use same cheese for mixing and topping.
* You can use all purpose flour alone too.
* You can use any kind of topping other than red bell pepper and olives.

Related Posts
Pizza Pull Apart Bread
Whole wheat pizza with tofu & mushroom
Apple Pizza
Chicken tikka Pizza
Soft Garlicky Bread sticks
Cottage Cheese-Egg Muffins